【Flutter初心者】環境構築した後に学んでいくべき超基礎【Step①:Hello Worldを表示させる】

こんにちは、ちくたっく(@tictak_py)です。
前回、flutterの環境構築(Windows向け)に関する記事を書いてみました。
【Windows向け】flutterで環境構築する方法を解説します【僕がハマったエラーも公開】
「flutterの環境構築をしていきたい!」と考えているWindowsユーザー向けの記事です。はじめの一歩となる環境構築ですが、思いのほかエラーに悩まされてしまったので、どうやって進めればいいか知りたい方だけでなく、エラーで進めなくて困っている方も参考にしてみてください。一緒にflutterをはじめる準備をしましょう!
僕は現在進行形でflutterを学習中なのですが、環境構築が出来てホッとしたのも束の間「これから何すればいいんだろう」といった感じになりました。flutterに関する日本語の文献はまだまだ少ないのでどう勉強しようかなと思っていましたが、僕は公式ドキュメントを参考にして学習することにしました。
ただ内容が英語だったり、今一つ進め方がわからず困っている人もいると思ったので、自分のアウトプットかねて「環境構築した後に学んでいくべき超基礎」を以下全4回にわけて解説していこうと思います。
- Hello Worldを表示させる
- 外部パッケージを使えるようにする
- ウィジェットを追加する
- スクロールするListViewを作る
上記の流れは公式ドキュメントを参考にしているので、興味のある方は原文も見てみてください。
初回となる今回は「Hello World」をAndroidエミュレータで表示することを目的としています。Hello Worldを表示させるだけならすぐに終わりますが、その過程で知っておきたいポイントも自己流で紹介していこうと思います。
こんな方に読んで欲しい記事です
- flutterの環境構築をしたばかりの初心者の方
- flutterの環境構築をした後に何をすればいいか悩んでいる方
Android Studioを起動できるようにする
まずは、Android Studioを起動できるようにしましょう。
バカにしてんのかと言われそうですが、これからアプリ構築で作業していくAndroid Studioをすぐに起動できるようにしておかないと話になりません。多くの人はAndroid Studioを使っているかと思いますが、Visual Studio Codeなど自分が使うエディタを起動する方法を確認しておいてください。
Windowsユーザーなら、Windowsキーから「Android」と入力すれば出てきます。
New Flutter Projectを作れるようにする
Android Studioが起動したら「New Flutter Project」を作れるようにしましょう。
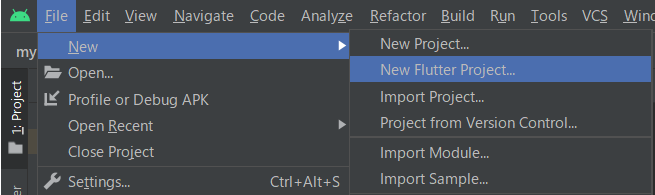
「New Flutter Project」の画面がない場合、プラグインで「Flutter」「Dart」の2つがインストールされていない可能性があるので確認してみてください。
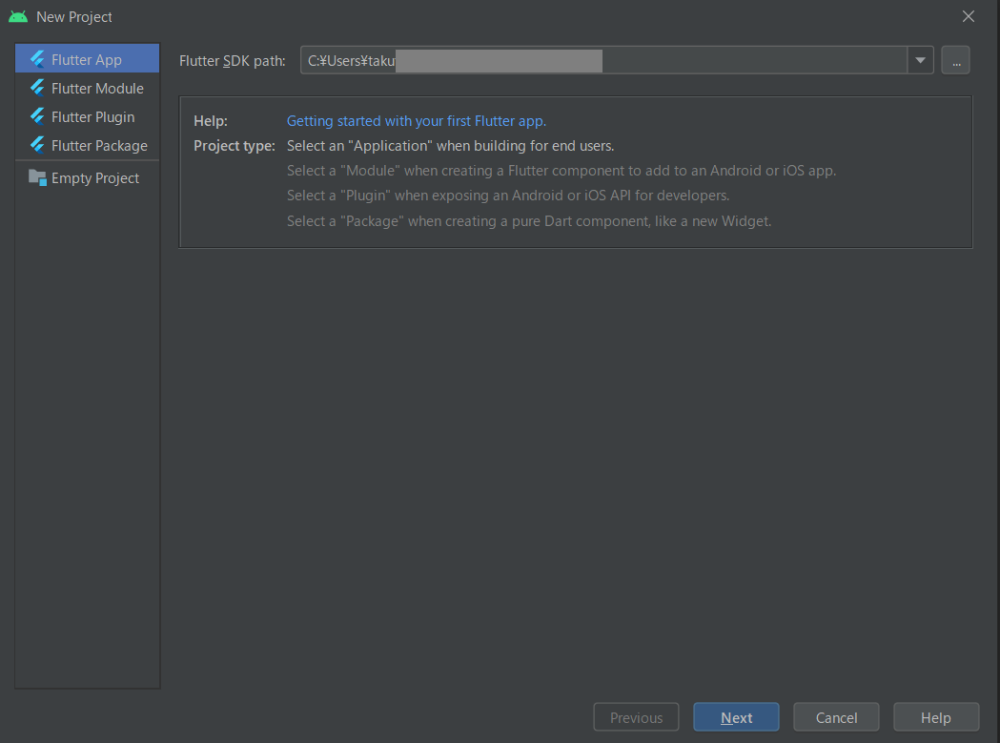
New Flutter Projectを作成したら、まずSDKのパスが正しいかチェックしましょう。ここは自分が設定したパスが指定されているかと思います。
次に、プロジェクト名を決めます。なんでもいいですが、今回は「my1st_app」としています。必要に応じてOrganaization部分を変えてみてもいいでしょう。僕は自社のドメインを逆に並べて記載してます。
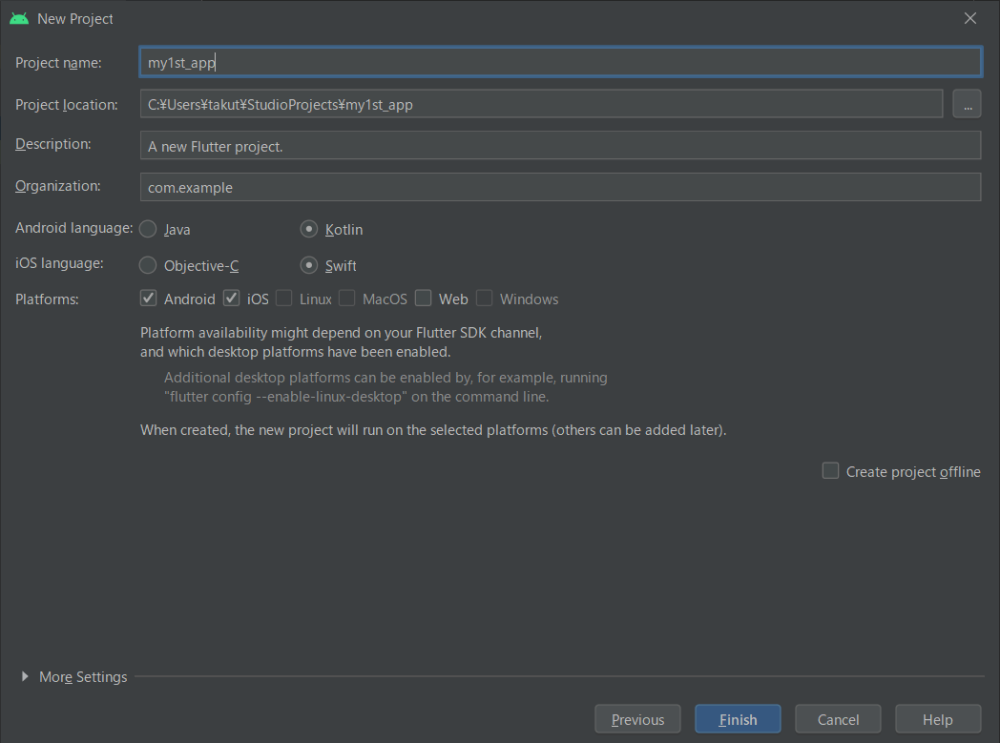
ここで1つ知っておいた方が良いかなと思うのが、プロジェクトファイルの場所です。上記「Project Location」の箇所がこれに該当しますが「C:\Users\(ユーザー名)\StudioProjects\(プロジェクト名)」にファイルが作られています。
プロジェクトファイルが作られると、以下のような画面に移るかと思います。
Android Studio起動後は、毎回この画面で操作していくことになります。
main.dartファイルの存在を知る
今回は「Hello World」をAndroidエミュレータで表示させることが目的となりますが、メインとなるコードはどこに書けばいいのか、これも知っておかないと話になりませんよね。
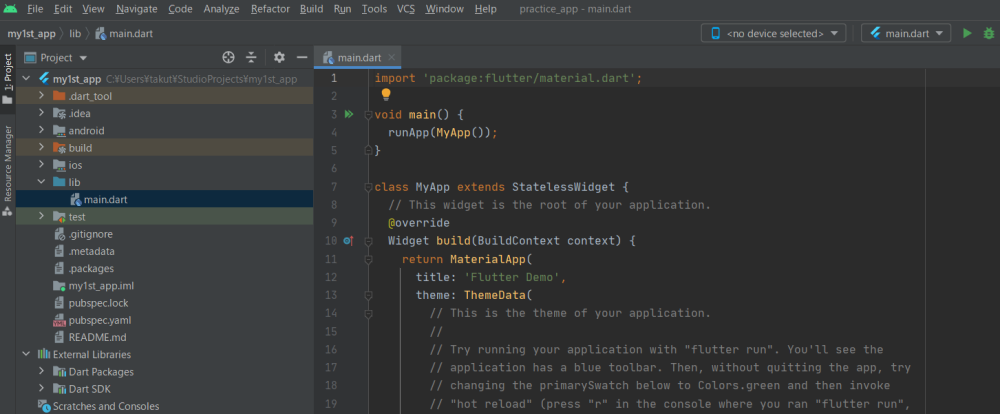
ご存知の方も多いでしょうが、FlutterはDartというプログラミング言語をベースにしているので「.dart」というファイルにコードを書いていくことになります。それが「main.dart」というファイルです。
先ほどの画面で見えているコードは「main.dart」ファイルの中身なのですが、表示されていない方は以下の画面内の赤枠部分を確認してみてください。
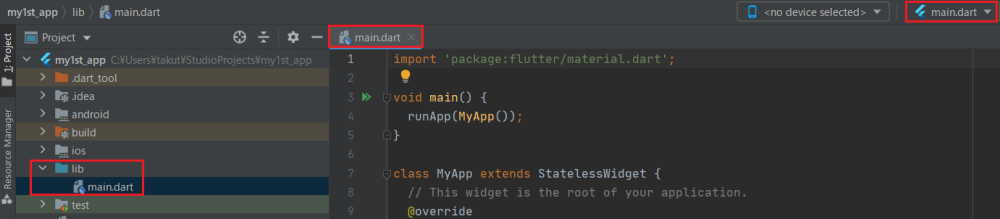
ここで知っておいて欲しい点は以下の2つです。
- Flutterの中心となるコードはほぼ「main.dart」に書いていく
- main.dartファイルは「lib/main.dart」に格納されている
すでに「main.dart」ファイルにはコードが色々書かれていますが、これはカウントアップアプリ用のコードとなるので、ここを編集していくイメージとなります。デフォルトでは以下のコードが書かれています。
import 'package:flutter/material.dart';

void main() {
  runApp(MyApp());
}

class MyApp extends StatelessWidget {
  // This widget is the root of your application.
  @override
  Widget build(BuildContext context) {
    return MaterialApp(
      title: 'Flutter Demo',
      theme: ThemeData(
        // This is the theme of your application.
        //
        // Try running your application with "flutter run". You'll see the
        // application has a blue toolbar. Then, without quitting the app, try
        // changing the primarySwatch below to Colors.green and then invoke
        // "hot reload" (press "r" in the console where you ran "flutter run",
        // or simply save your changes to "hot reload" in a Flutter IDE).
        // Notice that the counter didn't reset back to zero; the application
        // is not restarted.
        primarySwatch: Colors.blue,
      ),
      home: MyHomePage(title: 'Flutter Demo Home Page'),
    );
  }
}

class MyHomePage extends StatefulWidget {
  MyHomePage({Key? key, required this.title}) : super(key: key);

  // This widget is the home page of your application. It is stateful, meaning
  // that it has a State object (defined below) that contains fields that affect
  // how it looks.

  // This class is the configuration for the state. It holds the values (in this
  // case the title) provided by the parent (in this case the App widget) and
  // used by the build method of the State. Fields in a Widget subclass are
  // always marked "final".

  final String title;

  @override
  _MyHomePageState createState() => _MyHomePageState();
}

class _MyHomePageState extends State<MyHomePage> {
  int _counter = 0;

  void _incrementCounter() {
    setState(() {
      // This call to setState tells the Flutter framework that something has
      // changed in this State, which causes it to rerun the build method below
      // so that the display can reflect the updated values. If we changed
      // _counter without calling setState(), then the build method would not be
      // called again, and so nothing would appear to happen.
      _counter++;
    });
  }

  @override
  Widget build(BuildContext context) {
    // This method is rerun every time setState is called, for instance as done
    // by the _incrementCounter method above.
    //
    // The Flutter framework has been optimized to make rerunning build methods
    // fast, so that you can just rebuild anything that needs updating rather
    // than having to individually change instances of widgets.
    return Scaffold(
      appBar: AppBar(
        // Here we take the value from the MyHomePage object that was created by
        // the App.build method, and use it to set our appbar title.
        title: Text(widget.title),
      ),
      body: Center(
        // Center is a layout widget. It takes a single child and positions it
        // in the middle of the parent.
        child: Column(
          // Column is also a layout widget. It takes a list of children and
          // arranges them vertically. By default, it sizes itself to fit its
          // children horizontally, and tries to be as tall as its parent.
          //
          // Invoke "debug painting" (press "p" in the console, choose the
          // "Toggle Debug Paint" action from the Flutter Inspector in Android
          // Studio, or the "Toggle Debug Paint" command in Visual Studio Code)
          // to see the wireframe for each widget.
          //
          // Column has various properties to control how it sizes itself and
          // how it positions its children. Here we use mainAxisAlignment to
          // center the children vertically; the main axis here is the vertical
          // axis because Columns are vertical (the cross axis would be
          // horizontal).
          mainAxisAlignment: MainAxisAlignment.center,
          children: <Widget>[
            Text(
              'You have click the button this many times:',
            ),
            Text(
              '$_counter',
              style: Theme.of(context).textTheme.headline4,
            ),
          ],
        ),
      ),
      floatingActionButton: FloatingActionButton(
        onPressed: _incrementCounter,
        tooltip: 'Increment',
        child: Icon(Icons.add),
      ), // This trailing comma makes auto-formatting nicer for build methods.
    );
  }
}
最終的には書かれているコードの内容を理解していくべきですが、いきなりは難しいので少しずつでいいと思います。Dart言語をガッツリ勉強するよりも、Flutterでアプリを作りながらDart言語を学んでいくスタンスの方がコスパいいはずです。
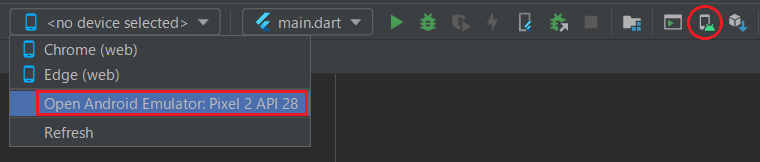
Androidエミュレータを起動する
Hello Worldを表示させる前に、エミュレータを起動しておきましょう。エミュレータって言うとなんか難しそうですが、仮想的なAndroid端末を表示させるやつです。
以下の画面にあるように「Device」か「AVD Manager」を選択すれば起動できます。
初めて起動する場合は設定が必要です。やり方は前回記事を参考にしてください。
Androidエミュレータが起動したら、再生ボタンかドロイド君ボタン(虫マーク)を押してアプリを起動させておいてください。環境にもよりますが、30秒から1分くらいの時間がかかるのが一般的らしいです。
Hello Worldを表示させてみる
それでは最後に、今回の目的である「Hello World」を表示させてみましょう。
現在アプリが起動している状態だと思いますが、このまま以下のコードをコピペして、main.dartファイルを書き換えてみてください。
// Copyright 2018 The Flutter team. All rights reserved.
// Use of this source code is governed by a BSD-style license that can be
// found in the LICENSE file.
import 'package:flutter/material.dart';
void main() => runApp(MyApp());
class MyApp extends StatelessWidget {
@override
Widget build(BuildContext context) {
return MaterialApp(
title: 'Welcome to Flutter',
home: Scaffold(
appBar: AppBar(
title: const Text('Welcome to Flutter'),
),
body: const Center(
child: Text('Hello World'),
),
),
);
}
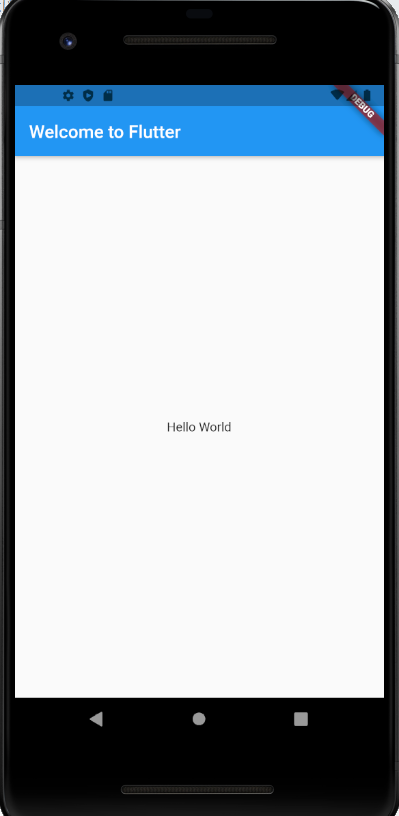
}上書き保存(Ctrl+S)するかホットリロード(稲妻ボタン/Ctrl+¥)することで、Androidエミュレータの表示が変わります。
無事に「Hello World」が表示されていれば成功です。
さいごに
今回はFlutter初心者向けの超基礎として、Hello Worldを表示させるまでの流れを紹介してきました。
基礎すぎる内容だったかもしれませんが、こういった内容を解説してくれている記事が案外なかったので書いてみました。これからFlutterを勉強していきたい方の参考に少しでもなればうれしいです。
僕もまだ勉強中なので、アプリ開発できるように一緒にがんばりましょう!
ではまた。